Occasionally one of the LX200 control paddles will begin making a slightly discomforting rattling noise. Most of the time, this doesn’t seem to be a cause for worry, and the paddle is left to rattle.
On rare occasions, the rattling stops – and so does the hand paddle. Still, don’t panic. Both the (now quiet) rattling and the sudden paddle outage are likely caused by the same thing and are easily fixed. Odds are good that all that needs to be done is the tightening of a nut.
What, Where and How:
There are a couple places within the hand paddle where nuts and washers can come loose. This is more than likely what’s causing the rattling noise. If one of these pieces gets caught on an electrical component or connection, it could cause a short circuit. Most of the time, this is an easy fix.
- Open the paddle by removing the 4 Phillips-head screws on the back panel. Note that these screws have flat bottoms.
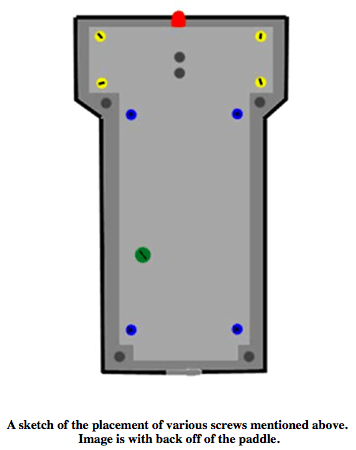
- Remove the back carefully. The problem nut(s) and possibly the related washer(s) might fall out. Remove the nut and washer and set aside carefully. These pieces of hardware come from the back of the 4 flat-head screws on the top portion of the circuit board (in yellow on figure below). These hold together the main board and the smaller display circuit board, with spacers in between to keep them separate. While these screws don’t have the room to actually fall out with the paddle’s back on, they slip out extremely easily without nut or back to hold them on. Be careful as you’re working not to let them fall out and get lost.
- In order to access these screws to put their nuts back on, remove the 4 Phillips screws on the lower 2/3 of the circuit board (blue). Note that these are pointed. Removing these allows you to remove the “guts” of the paddle most of the way – it is still connected by various wires and a wire ribbon on one side. Careful as you are working not to touch the components. Also, careful not to let those loose screws fall out.
- Examine the innards to see how many nuts are loose, how many washers are missing, and find all of them that you can. They like to hide. A good place to check is the slot that the wire ribbon goes into – it’s a little sticky, and I have found that nuts and washers like to get stuck down there. They might also fall into some of the LED holes or get caught on a component. Check around and carefully remove these with tweezers if necessary.
- Replace the missing nut(s) and washer(s), tightening the screw(s). Go ahead and make sure all the other washers are tight while you’re at it. If you can’t find all the missing pieces, replace what you can, at the very least. As long as there aren’t any little metal bits floating around to get caught on things it should be okay. Remember, the screws aren’t going to fall out with the back on, but be sure to at least have one or two that won’t fall out, period.
- While you’re in here, you might want to check one other nut that can come loose. There’s a larger flat-head screw towards the bottom and side of the main circuit board (green). Verify that this is there and secure before closing everything back up.
- Replace the “guts,” being careful to align the various LEDs with their holes. Secure the board with the 4 pointed screws. Finally, replace the back and secure it with the 4 flat-tipped screws.
This process should solve the rattling problem. If the paddle had died as well, test it now on a telescope to see that it works properly. When dissecting a paddle that has died be sure to note, if possible, where the nut or washer was wedged or caught. This information will probably be handy for a repairman if one is necessary. A quick sketch should get the point across.
With any luck, though, this quick repair has fixed any problems the paddle had and it can now be returned to its telescope for more nights of happy observing.
-BEB, 4/2005